Author Topic: Ninja  (Read 26700 times)

antonio

  • Newbie
  • *
  • Posts: 20
    • View Profile
Ninja
« Reply #30 on: December 22, 2012, 13:56:50 PM »
Quote from: "Fred"
A bit late, but well done, looking very good so far  :clap:
I had a Ninja a long time ago, and along with the Ridge Racer was one of my favorite glider at the time  :D


Thanks, Fred. Good to know. After much reading I decided to go for an unmodified version of the Ninja, so no rudder, no separate aileron servos, just standard build. Partly because I don't feel that comfortable making mods on my first non-ARF, and partly because many comments say it's a nice fun glider that way anyway.

So the only "mods" I am planning are fuse reinforcement, based on comments about its weak spot around F3, and maybe a ballast box.

Ah, these are the Ninja instructions btw: http://www.sigmfg.com/BuildManuals/SIGRC63NinjaP1.html

antonio

  • Newbie
  • *
  • Posts: 20
    • View Profile
Ninja
« Reply #31 on: December 22, 2012, 14:26:15 PM »
OK Keith, more pictures!

Next was gluing the two wings together. I've read every possible opinion about Ninja dihedral but I went for the suggested 1 inch elevation at the wingtip. SIG claims the foam cores are already cut at the approximate angle for that, and I found that to be quite accurate. A tiny bit of sanding and I had a nice joint, went together with 30-min epoxy and taped in place.


And then the fixed portion of the trailing edge that houses the aileron rods. This is done by driving a bent rod through a brass tube that is concealed inside a grooved section of the trailing edge. Better seen than explained:


So what I found was that even pushing the brass tube all the way inside the trailing edge piece, the tube protuded just a tiny bit. I ended up sanding a very shallow groove in the wing, it seemed easier than deepening the existing one on that tiny piece! Here are the two wings glued together, with the right side of the trailing edge already in place, and the left side with a tiny groove being sanded. Once that was done, the piece would sit tightly and aligned just as required.


antonio

  • Newbie
  • *
  • Posts: 20
    • View Profile
Ninja
« Reply #32 on: December 22, 2012, 14:43:45 PM »
Another new task for me, glass reinforcement. I applied a generous amount of epoxy, then placed the cloth on top and squeegeed with a bit of plastic-coated cardboard. Nice finish except at the edges where I had to cut the material, then threads would come loose and become quite unmanageable once soaked up in epoxy.

Now I'm dreading the task of reinforcing the outside of the fuse as I had planned - the glass cloth I have for that is quite coarse compared to this one provided by SIG, so more chances for fibre threads to go wild. Any suggestions to keep glass cloth edges under control?


Starting to look like a wing...

Happy Days

  • ISR Club Member
  • Newbie
  • *
  • Posts: 2184
    • View Profile
Ninja
« Reply #33 on: December 22, 2012, 17:28:58 PM »
Hmmm, very good I must say!

So what subject are you studying Antonio? English language perhaps? You have very good descriptive skills.

After browsing through those build instructions for your Ninja I thought you might like to make use of this little tip. I use it for some of my models where the fuse and wings are retained by nylon screws.

To explain the purpose of this modification first:
I found that despite being an expert rc pilot, (okay,… so I tell lies,) there were some occasions, (read, ‘often’) when the wind would suddenly change direction just as I was landing, or the ground would suffer a minor earth quake and momentarily rise up just as my plane was about to touch down. (Like I said,…I tell lies.) The net result of these totally unpredictable occurrences was that one wing tip would touch the ground before the fuse did. This resulted in a tremendous torque being applied to the wing / fuse area often resulting in damage to the afore mentioned parts of the airframe. :evil:
Having thought about this problem, I came to the following conclusion. That Force, being the Product of Inertia times Mass. Plus the fact that every action has an equal and opposite reaction, and that E = MCC and that I was getting more and more pissed off at having to repair repairs that themselves were repairs :evil: ,…I came up with this solution.

Drill a shallow hole through the head of the nylon retaining screws. By weakening the screw thus, the head of the screw ‘pops off’ when exposed to excess stress thereby allowing the wing to separate from the fuse and saving damage to either part of the airframe. :P
The only downside of this solution is the need for a constant supply of fresh nylon screws until such time as one gets better at landing. (That’s why I’m still drilling nylon screws! :oops: )

Here’s one I drilled earlier…….
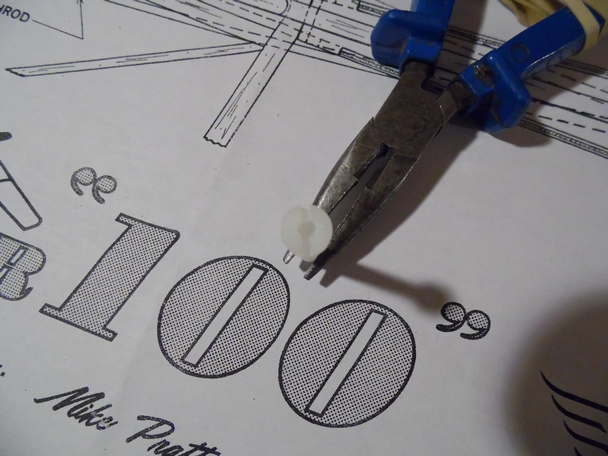


Keep up the good work Antonio,...Tally-Ho.
Keith
Try not to run out of airspeed, altitude and ideas....... all at the same time.

selleri

  • Newbie
  • *
  • Posts: 466
    • View Profile
Ninja
« Reply #34 on: December 23, 2012, 01:38:23 AM »
Regarding the fiberglass finish, plastic bags are your friends. Not sure what the correct name is but it's the "soft" clear bags, not the ultra thin(noisy ones) but the more substansial ones.

Put them over when you've squeezed out most of the epoxy, "rub" them lightly down but beware that any crevises and folds will show up on the finished coat. This will give you an almost mirror smooth surface and help keep the edges neat.
Sverrir - Icelandic Volcano Yeti

antonio

  • Newbie
  • *
  • Posts: 20
    • View Profile
Ninja
« Reply #35 on: December 23, 2012, 13:10:33 PM »
Thanks for the tip, Keith. Hmmm... weakened nylon bolts, great idea. The Ninja wing is fixed with a nylon bolt screwed directly into a piece of hardwood that is supposed to be "tapped". I don't know how to get one of those taps, which has an American thread (although equivalent to M5 I think) and I keep thinking that a blind nut would be better. Maybe I'll change that too.

My studies... they are about online and distance learning. How to enable learning through technology, etc. Years ago I used to write technical books and articles, if you think my writing is descriptive, maybe I still keep some of that!

antonio

  • Newbie
  • *
  • Posts: 20
    • View Profile
Ninja
« Reply #36 on: December 23, 2012, 13:28:45 PM »
Quote from: "selleri"
Regarding the fiberglass finish, plastic bags are your friends.


OK, I think I know the type of plastic you are talking about (increasingly harder to get here since the introduction of the shopping bag levy), but I have a stupid question for you: do you keep the bag while the epoxy cures, or remove it immediately after rubbing it smooth, half-way through the curing process, or...? As you see I have no clue if epoxy sticks to that kind of plastic. Ah, blissful ignorance.  :?

Thanks for the tip! I'll try that with the fuse. Too late for the wing but fortunately the ugliest bits will be hidden from view.

selleri

  • Newbie
  • *
  • Posts: 466
    • View Profile
Ninja
« Reply #37 on: December 23, 2012, 15:18:47 PM »
I let it cure with the plastic on, that gives the smooth finish.

You might want to do a test to see if the plastic you have sticks to the epoxy, food wrapping film doesn't stick but it is so thin that you'd probably have a hard time getting it go on without wrinkles.

I cut down sandwich bags.
Sverrir - Icelandic Volcano Yeti

Fred

  • Slope Soaring is not a crime!
  • Administrator
  • Newbie
  • *****
  • Posts: 5121
  • Gliderist Simplex
    • View Profile
    • http://www.gliderireland.net
Ninja
« Reply #38 on: December 24, 2012, 21:06:25 PM »
You can also use one of these long balloons that some guys in a usually weird costume uses to make dogs, spiders, swords etc etc  :D

And of course, the condoms, and always fun to go in a pharmacy and ask for king size or bigger!  :lol:
Always better to try to wrap the fuselage in one go. Cling film will work, but is a real pain to remove.
Education is important, but flying RC planes and gliders is importanter!

antonio

  • Newbie
  • *
  • Posts: 20
    • View Profile
Ninja
« Reply #39 on: December 29, 2012, 17:39:49 PM »
Quote from: "Fred"
You can also use one of these long balloons that some guys in a usually weird costume uses to make dogs, spiders, swords etc etc  :D

And of course, the condoms, and always fun to go in a pharmacy and ask for king size or bigger!  :lol:


Interesting... I'd love to see a picture of a fuse going through this process  :D

Meanwhile, wing work continues... cutting out the servo space. I was concerned about hitting the bottom sheeting with the blade and damaging it but I found a way of combining blade and a flat screwdrive for scooping out the foam that left a reasonably straight servo housing. All lined with a generous layer of epoxy.

antonio

  • Newbie
  • *
  • Posts: 20
    • View Profile
Ninja
« Reply #40 on: December 29, 2012, 17:52:39 PM »
OK, so next was covering. Again, something I've never done before, so I started with a scrap piece, then the elevator, then moved on to the canopy, and finally did the entire fuse. I have no idea about what "finished" is - I used just enough heat to activate the glue and get things in place, and then increased temperature to get the material to shrink and get the right shape. But how far is good enough? I don't want to warp the model, so no extra heat applied where things looked OK. Reasonable approach?  :?:


antonio

  • Newbie
  • *
  • Posts: 20
    • View Profile
Ninja
« Reply #41 on: December 29, 2012, 18:01:31 PM »
My "least favourite" activity so far: cutting hinge slots. Grrrr... I'm sure there is a Dremel accessory that makes this a 30-sec job. Maybe it's time to get one...

Happy Days

  • ISR Club Member
  • Newbie
  • *
  • Posts: 2184
    • View Profile
Ninja
« Reply #42 on: December 30, 2012, 06:27:16 AM »
Glad to see you're sober enough to make an entry on the forum Antonio!

Yea, slot cutting is such fun! 8)  I love it. :D  (Not :( ) But look at it this way, wouldn’t life be boring if everything was easy? :wink:

Nice bit of covering by the way. You’re doing it the same way I do,….and as far as I know, just about everybody else does it as well.

Just one slight potential hick-up to warn you of. Black covering is a devil in hot sunshine. You might find it ‘bubbles’ or becomes loose if left in the summer sun, especially if left in the sun while inside your car. If we ever get another summer, best thing is to keep it in the shade until you come to fly it. (Just something to be aware of.)

So, what’s next? Tail feathers or wings?

Keith
Try not to run out of airspeed, altitude and ideas....... all at the same time.

Freedom Flyer

  • Newbie
  • *
  • Posts: 69
    • View Profile
Great Job
« Reply #43 on: February 17, 2013, 17:16:08 PM »
Antonio,
 
Nice job, looks as if you are being very thorough.  I believe that Sig released that plane in the late '80's I always wanted one but never got one. I thought the colors were really cool and ended up actually using those colors on anotherglider I had scratch built, a "Ridge Rat."  It was great as long as I was flying during a bright, sunny, cloudless, bright blue sky day.  I loved the look and the way that I had done the color scheme but boy was it tough to see.  I eventually stripped it down and recovered it in White, dark red, and metallic blue, shows up much better now. I actually still have it, hard to believe that it's now 28 years old. :shock:

Don't mean to discourage you if you've got a color scheme worked out but you might want to try to work some lighter colors in with the black fuse. My older brother just finished his Ninja last fall, I'll see if I can aquire some pictures of it, he did a beautiful job.  He always does wonderful things with Monocote, but makes it tough when he has to do a repair.
Still learning after all these years

antonio

  • Newbie
  • *
  • Posts: 20
    • View Profile
Ninja
« Reply #44 on: February 17, 2013, 19:00:07 PM »
The plan is to have some bright yellow and red there as well. Unfortunately 2013 has been quite busy and there hasn't been any progress on the Ninja. But I'll keep posting as that touch of colour I had planned starts to show up. Thanks for the tip!