Author Topic: I'm drowning, in bits of an Mu28  (Read 34719 times)

Happy Days

  • ISR Club Member
  • Newbie
  • *
  • Posts: 2184
    • View Profile
I'm drowning, in bits of an Mu28
« Reply #45 on: December 01, 2011, 20:42:40 PM »
Yes Richard, this is hard to explain.

Let me try again………….

Here is a picture of three sections which make up one wing half. In this picture they are stacked on top of one another. If each of these sections are placed end to end they would be 2mtrs long. (One wing half of a total wing span of 4mtrs)


This next picture shown that each of the sections are themselves made up of three farts…(oooppss y sorry, that should read ‘three PARTS’) I’ve slid the bottom, middle, (wing core) and top parts back to try and make them easier to see


1 A bottom (or what I call a base ) piece
2 A middle part, which is what will become the core of the wing . It’s been cut to the airfoil cross section. (This one is semi symmetric)
3 And a top piece which lays on top of the wing core.
Look, here is a picture of just the top & bottom parts without the center core. You can see the semi symmetric hole.


Now,  imagine just taking the bottom part of each of the three sections and laying them on a table. (Remember, the top part and the wing cores of each section have been taken away) So just the bottom parts are placed, end to end, on the table. As the edge of one bottom section butts up to the edge of the next bottom section there should be a smooth, (flush) continuance of the airfoil shape. But there isn’t. Instead there is a ridge where the edge of one section meets the next.
Unfortunately I can’t get a clear picture of the problem, it just comes out as a mass of white.
Think of two railway lines being joined end to end. (In my day of steam locos the rails were joined using what were called fish couplings. Bit before your time I expect) Now imagine that instead of the two rails meeting at the same height end to end, one rail was two inches taller than the other one. (the bottoms of the rails were level, but as I said, one rail was taller.) The passengers on the train would get a very bumpy ride!!!
That’s what’s happening to the airfoil cores of these three sections. The bottom parts of each section are different thicknesses, therefore the core sits at different heights within each section.

Tell me if you understand or not? :(

K.
Try not to run out of airspeed, altitude and ideas....... all at the same time.

johnfireball

  • Newbie
  • *
  • Posts: 276
    • View Profile
I'm drowning, in bits of an Mu28
« Reply #46 on: December 01, 2011, 22:07:03 PM »
Hi Keith,
          Why not join the wing sections without the outer waste being used. pack the leading and trailing edges with wood spars laid on your flat building board and glue wing together.
John.
I have the body of an 18 year old.........I keep it in the freezer

Happy Days

  • ISR Club Member
  • Newbie
  • *
  • Posts: 2184
    • View Profile
I'm drowning, in bits of an Mu28
« Reply #47 on: December 01, 2011, 22:57:37 PM »
Good idea John!
Must confess I’ve never built a wing of this type before. In fact I haven’t done very much building at all. (Plenty of repairs :oops: , but not much building! )

I’m thinking that the only problem I can see with your suggestion is the question of how to accommodate the wings thickness taper. Like most wings it’s thinner at the tip than at the root. :!:

Anyone else got any input on this idea?

Keith
Try not to run out of airspeed, altitude and ideas....... all at the same time.

johnfireball

  • Newbie
  • *
  • Posts: 276
    • View Profile
I'm drowning, in bits of an Mu28
« Reply #48 on: December 01, 2011, 23:30:09 PM »
Hi again Keith,
                   The taper is usually on the top surface so the bottom is flat unless you need washout whereby you pack the tip trailing edge.
John.
I have the body of an 18 year old.........I keep it in the freezer

johnfireball

  • Newbie
  • *
  • Posts: 276
    • View Profile
I'm drowning, in bits of an Mu28
« Reply #49 on: December 01, 2011, 23:57:40 PM »
What I would do,
                       Glue it together on the flat best as you can (eyeball is pretty accurate). When you go to veneer and gluing all will probably change(warping, glue shrinkage and whatever) steam from the kettle is a great corrector. Glue something, get going and it'll work out.
John.
I have the body of an 18 year old.........I keep it in the freezer

Happy Days

  • ISR Club Member
  • Newbie
  • *
  • Posts: 2184
    • View Profile
I'm drowning, in bits of an Mu28
« Reply #50 on: December 02, 2011, 12:26:54 PM »
Ar-ha!…..........after a meeting with a fiend, and an email from another friend. :D  (Actually I shouldn’t call them ‘friends’, but clients. You see, clients are tax deductible, friends aren’t! :wink: ) The Keithy has found the answer. :P

Actually it’s so obvious I don’t know why I didn’t think of it myself. :roll:

Shall I tell you what the answer is? Do you really want to know?? 8)

Oh, all right then. The answer is “Shims” :shock:
To explain:-

When I place the bottom parts of each section onto the bench, the sections that are lower, than the adjacent section, simply have some pieces of thin ply, or similar material placed underneath them to bring them up to the same height. If one side of a section is lower than the other, the same solution applies.

THERE,…..pure & simple. (Just like me! :lol:  )

Keith
Try not to run out of airspeed, altitude and ideas....... all at the same time.

Fred

  • Slope Soaring is not a crime!
  • Administrator
  • Newbie
  • *****
  • Posts: 5121
  • Gliderist Simplex
    • View Profile
    • http://www.gliderireland.net
I'm drowning, in bits of an Mu28
« Reply #51 on: April 06, 2012, 20:31:32 PM »
Ok, was minding my own business on the Interweb, when I found this! :


Though of you. Look how this glider looks cool!  :mrgreen:
Nice change from the Fox, Swift etc etc !

Need more motivation?  \:D/
Education is important, but flying RC planes and gliders is importanter!

Happy Days

  • ISR Club Member
  • Newbie
  • *
  • Posts: 2184
    • View Profile
I'm drowning, in bits of an Mu28
« Reply #52 on: April 12, 2012, 19:53:34 PM »
Hey, I’ve only just come across this picture Fred. :D

 Hhhhmmmmm, does look kinda neat, 8) ….but what does it fly like??? :!:

 Guess there’s only one way to find out. Get someone to build my kit for me and then go fly it! 8)  8)  

Offers anyone? :wink:

K.
Try not to run out of airspeed, altitude and ideas....... all at the same time.

Happy Days

  • ISR Club Member
  • Newbie
  • *
  • Posts: 2184
    • View Profile
I'm drowning, in bits of an Mu28
« Reply #53 on: July 14, 2012, 13:11:18 PM »
So the build begins. After much deliberating and procrastinating I’ve started assembling the wings.(Please don’t all faint, or worse, start laughing!)

But! I’ve hit a problem…………. :?:

Looking at Fred’s structure for a composite spar,       http://www.gliderireland.net/index.php/techniques/composite-spars  my thought is this:
It’s a little difficult to explain so, dear readers, imagine the wing profile. Thinking about the top of the thickest part of the profile.
Fred suggests sanding a ’groove’ equal to the thickness of the carbon tape that is to be laid into it.  All good so far. :)
The problem comes in that the bottom of the groove will be ‘flat.’ Therefore after the tape has been epoxyed into place the top of the tape will also be flat. This will make the top of the thickest section of the profile flat and not ‘rounded’ as it would be if I hadn’t sanded a groove and fitted the tape into the top of the wing. :!:
The tape is 37mm wide, and the wing tip chord is 180mm,….that means 20% of the top of the profile at the tip will be flat instead of the correct profile. (Basically a convex arc)

Of course my big question is,….Will it adversely effect the flying capability???  

What do you think gentlemen?

Keith
Try not to run out of airspeed, altitude and ideas....... all at the same time.

billscottni

  • ISR Club Member
  • Newbie
  • *
  • Posts: 1459
    • View Profile
    • http://www.nimsa.co.uk ; www.billscott.org.uk
I'm drowning, in bits of an Mu28
« Reply #54 on: July 14, 2012, 15:38:02 PM »
37mm seems very wide for a spar Keith.  Half of that would be plenty and double the thickness if you're concerned. Instead of sanding of out, you could cut your groove with a hot wire and then trim it to fit back once the spar is in?

Fred may have a better suggestion

Happy Days

  • ISR Club Member
  • Newbie
  • *
  • Posts: 2184
    • View Profile
I'm drowning, in bits of an Mu28
« Reply #55 on: July 14, 2012, 18:55:53 PM »
Yea, Don’t have a hot wire I’m afraid Bill, and certainly not one 2 mtrs long.
Fred told me that the width should be between 25 and 50mm. I brought the tape believing it was 35mm wide, but on measuring it, it turns out to be 37mm. :!:

I’m in a bit of a dilemma, don’t know whether to go ahead and sand out the groove or not. Let’s see if anyone else has an idea?

K.
Try not to run out of airspeed, altitude and ideas....... all at the same time.

johnfireball

  • Newbie
  • *
  • Posts: 276
    • View Profile
I'm drowning, in bits of an Mu28
« Reply #56 on: July 15, 2012, 23:27:37 PM »
Hi Keith,
          Why not use what you have and smooth over to profile with a lightweight spackle filler available in diy shops.
John.
I have the body of an 18 year old.........I keep it in the freezer

gerryb

  • ISR Club Member
  • Newbie
  • *
  • Posts: 446
    • View Profile
I'm drowning, in bits of an Mu28
« Reply #57 on: July 16, 2012, 00:14:17 AM »
hi keith,  i have used 35mm wide spruce spars at the wing root and tapered the tips to 6mm. this taper started about 2/3 of the way out the wing. i also tapered the thickness from about 6mm at root to 3mm at the tip, also from 2/3 span.

is it possible for you to taper your carbon tape?

another 'filler' idea is to allow an extra 1mm in fred's sanding block idea. when the carbon tape is fitted and cured, glue 1.5mm balsa into the channel and then sand the balsa to the wing section shape. i have done this on spruce spars as above and it works very well.

Happy Days

  • ISR Club Member
  • Newbie
  • *
  • Posts: 2184
    • View Profile
I'm drowning, in bits of an Mu28
« Reply #58 on: July 16, 2012, 17:33:32 PM »
Yea, thanks for your suggestions lads. They both refer to over filling on top of the carbon  tape and then re-sanding to return the wing to profile.

I guess what I am unsure about is just how critical is it to get the correct profile throughout the entire length of the wing. Remember each wing half is two meters long, and the profile changes. At the root it’s an SB96, and at the tip it’s an SB96V.

I’m thinking, okay, so I sand the groove too deep for the carbon tape. I glue the tape in place. When the glue had gone off I use filler to make up the difference, slightly over filling the remaining groove on top of the carbon tape so the filler stands proud above the original wing surface. When the filler has gone  hard I start sanding. Here comes my point.
1/ The sanding block has a flat surface, the top of the wing is curved.
2/ if I just sand away the filler until I expose the foam sides of the top of the groove in the wing, then because the sanding block has a flat surface the top of the wing will now have a  flat section running along the length of the top of the wing. (ie, the part of the wing above where I glued the carbon tape in.)

Because the top curvature of the wing is no longer there, (I sanded it away to make a groove to glue the tape into) I don’t know how much of a curve to sand the top of the groove to.

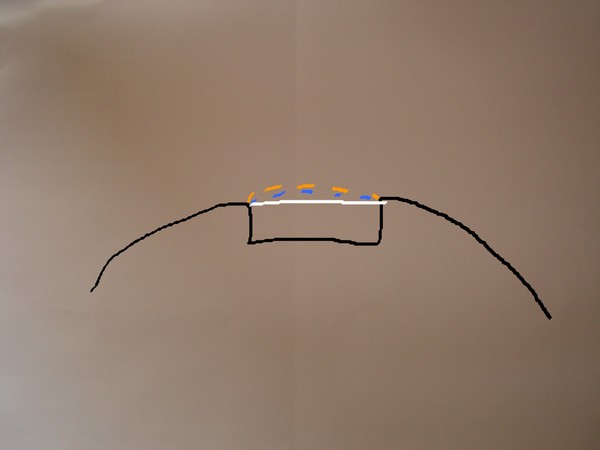
Have  a look at the picture. (I’m not very good with “paint pot” I’m afraid.)
The picture is supposed to show the top of the wing  profile.
Imagine I’ve sanded away a grove and fitted the tape and filler on top of it.
The white line shown the straight or ‘flat’ top that the sanding block would produce naturally.
Although exaggerated, the two coloured dotted lines show possible curvatures that I could shape the filler to, BUT… which curvature would be correct? (Having sanded the original curve away I no longer know what the correct curvature should be.)AND how do I sand it correctly for the entire length of the wing,…….and ensure that the other wing half is sanded to the same profile.
OR
Does it not really matter that much??? You see I have no idea how critical these profiles are.
Of course, what I don’t want to do is build the plane only to find it flys like a pig because the profile isn’t right!!!

I’m sure there is an answer to this matter, I just don’t know what it is, YET!


K.
Try not to run out of airspeed, altitude and ideas....... all at the same time.

billscottni

  • ISR Club Member
  • Newbie
  • *
  • Posts: 1459
    • View Profile
    • http://www.nimsa.co.uk ; www.billscott.org.uk
I'm drowning, in bits of an Mu28
« Reply #59 on: July 16, 2012, 20:36:38 PM »
If you let me know the root & tip chords Keith, I can send you full size wing sections that will help with the sanding