Author Topic: DIY Radio tray  (Read 30492 times)

EI1638

  • Newbie
  • *
  • Posts: 128
    • View Profile
DIY Radio tray
« Reply #15 on: June 15, 2013, 22:21:52 PM »
mit knudlen und sauerkraut bitte.

Back to the task in hand.

Stage one: Reduce, resuse, recycle:

Mockup produced in cardboard. 30 minutes or so of effort. Lots of notes now scribbled on the mockup. Actually did this a few weeks back, but some 'improvements' to the balsa dust factory slowed progress.

Material earmarked. Some scraps and some ply salvaged from a fancy wine box. More recycling. This will be painted in my trademark yellow when its all done (so that I can use filler and hide all my mistakes).

I got into the habit a while back of making sure all my ground kit was yellow. I'll still loose bits, but the yellow really stands out when I'm packing up to go home. I've not managed to lose a yellow item so far.


This will be disassembled into the relevant parts (tray top being the most important) and used as templates for the real one. Most likely the remaining pieces will be measured out based on the notes scribbled on the mockup.

Chris

Happy Days

  • ISR Club Member
  • Newbie
  • *
  • Posts: 2184
    • View Profile
DIY Radio tray
« Reply #16 on: June 17, 2013, 19:54:04 PM »
Yeah, it all looks very neat Chris. :D  How will you support it?

K.
Try not to run out of airspeed, altitude and ideas....... all at the same time.

EI1638

  • Newbie
  • *
  • Posts: 128
    • View Profile
DIY Radio tray
« Reply #17 on: June 17, 2013, 20:16:14 PM »
Ah Keith,

now that is the trick. Watch this space  :twisted:

chris

Happy Days

  • ISR Club Member
  • Newbie
  • *
  • Posts: 2184
    • View Profile
DIY Radio tray
« Reply #18 on: June 17, 2013, 20:31:03 PM »
I'm watching!..... I'm watching!!
Try not to run out of airspeed, altitude and ideas....... all at the same time.

Fred

  • Slope Soaring is not a crime!
  • Administrator
  • Newbie
  • *****
  • Posts: 5119
  • Gliderist Simplex
    • View Profile
    • http://www.gliderireland.net
DIY Radio tray
« Reply #19 on: June 18, 2013, 13:01:41 PM »
We are watching!  :clap:
For the support, on mine, this is how it's done (simple and works great)


Education is important, but flying RC planes and gliders is importanter!

EI1638

  • Newbie
  • *
  • Posts: 128
    • View Profile
DIY Radio tray
« Reply #20 on: June 20, 2013, 23:40:18 PM »
Ok, since I said I was recycling, I was running through my stock of plywood odds and ends. The biggest suitable piece I found came from a wardrobe, and is very definitely older than I am. The downside of this recycling is that the Nitromors had to come out to remove the layers of varnish applied at least 50 years ago.

Construction was in stages:

Stage one, cut out the platter, sides and rear piece based on the template and any notes scribbled there upon.


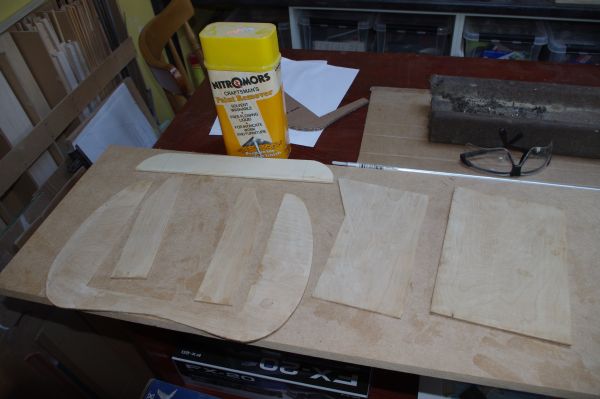
These were stuck together using mitre bond. This is medium cyano with kicker, intended for picture framing people. Seems to work rather nicely on model airplanes too. Other bits n bobs were cut out as required and stuck in place, resulting in this:


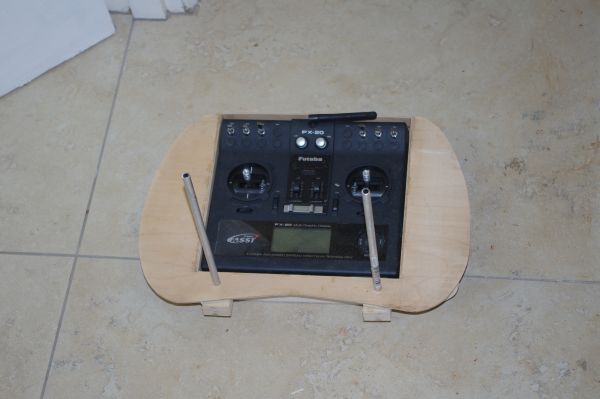
You can just make out the 'magic' pieces under the tray top. Here's a closer look:


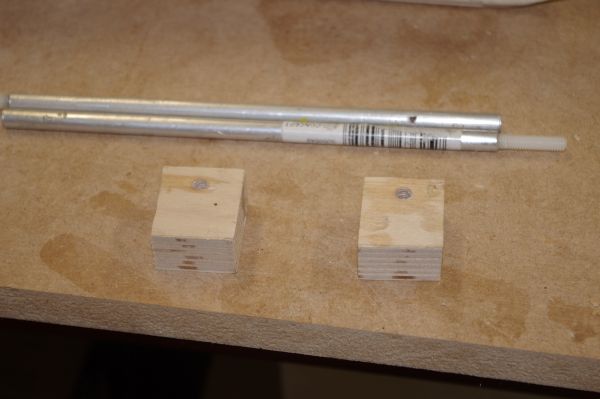
These are more blocks of scrap ply from some project or another salvaged/sacrificed for the greater good. The centres were marked and then drilled with a 5 mm drill bit.

These blocks of ply were then firmly fitted into a bench vice and tapped, using an M6 tap, to mate with standard (long) M6 wing bolts. The M6 bolts were epoxied and pinned into the arms so they can be removed later.

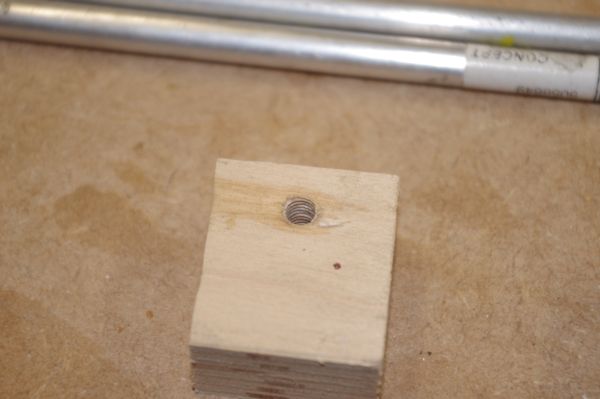
The key to tapping plywood is runny cyano. After the thread has been (carefully) cut, soak the thread liberally in runny cyano and forget about it for a while. When the cyano has set (this can take a while, longer than you might think) clear the threads using the tap. Voila, an M6 'nut' of plywood. This works for many screw sizes, the only gotcha is that it works best if the mating bolt is nylon, rather than steel.

Here's a closer look. If you look carefully the threads are visible in the plywood.


There we go, I need to tidy up a few little things, fill a few holes (from its former life as a wardrobe) and finish to look neat, but its perfectly usable in its current state now.

Probably 3 - 4 hours in total to get to this stage. The biggest delay was stripping the old varnish off the recycled ply.

Job done (almost). Pressure off now, need to transfer some model settings to new tranny and then its time to test it all out.

Happy Days

  • ISR Club Member
  • Newbie
  • *
  • Posts: 2184
    • View Profile
DIY Radio tray
« Reply #21 on: June 21, 2013, 07:30:25 AM »
Brilliant job Chris! :clap:  and at virtually zero cost,…..now there’s a man after my own heart! :D
Very neat, what I’d call a “Proper Job.”

I’ve never felt confident using threaded wood, so I’ve tended to insert blind nuts instead. (Just a personal preference.)

Not sure I believe your statment about the wardrobe being a lot older than you though. :?:   :lol:  :lol:

K.
Try not to run out of airspeed, altitude and ideas....... all at the same time.

EI1638

  • Newbie
  • *
  • Posts: 128
    • View Profile
DIY Radio tray
« Reply #22 on: July 02, 2013, 21:28:35 PM »
Finished item. ready to go


The fleet is now configured to work with this tranny and the 'sit' feels perfect. Now all need is the chance to crash, sorry, fly the models. I guess a crash is an uncontrolled (or should that be unplanned) landing.

Not sure anyone else will be inspired to try the genuine DIY route, but it ain't difficult, thats for sure :D

I based my dimensions on the Freds 'kit' photo as I was able to work out the approximate size of the 'wings' from the photo. In a moment of madness I thought there might be a scientific/ergonomic reason for the 'wings' of the tray to be a particular size. The rest of the design  used the tranny dimensions and the TLAR (That Looks About Right) design principle.

The biggest problem I had during this little project was with the rubbish spray paint I used (I'm trying to get rid of, by using, my various cans of rubbish paint. As everyone can gather, I'm too tight to throw it out and replace it with decent quality paint). I would have had that problem regardless of where the 'kit' was sourced :oops:

Chris

Fred

  • Slope Soaring is not a crime!
  • Administrator
  • Newbie
  • *****
  • Posts: 5119
  • Gliderist Simplex
    • View Profile
    • http://www.gliderireland.net
DIY Radio tray
« Reply #23 on: July 04, 2013, 20:11:40 PM »
That is looking really good Chris!  :clap:  :clap:

You can also put some Neoprene pads where your hands are resting on the tray  :D
I put mine (sticky backing) when the last layer of  varnish was sticky for better bond.
Education is important, but flying RC planes and gliders is importanter!

johnfireball

  • Newbie
  • *
  • Posts: 276
    • View Profile
DIY Radio tray
« Reply #24 on: July 23, 2013, 23:06:23 PM »
Hi Chris, Fred,
                   Making one myself at present and wonder what length tubes are required for best stability.
Thanks
John.
I have the body of an 18 year old.........I keep it in the freezer

Fred

  • Slope Soaring is not a crime!
  • Administrator
  • Newbie
  • *****
  • Posts: 5119
  • Gliderist Simplex
    • View Profile
    • http://www.gliderireland.net
DIY Radio tray
« Reply #25 on: July 24, 2013, 00:16:28 AM »
Hi John,

Not too sure what is the best, but just measured mine.
Lenght from top of the tray to top of tube:
DIY Tray: 17cm
MPX original tray: 14cm

No real difference between both to be honest, even with the original MPX tray with the hook being in a more forward position ( was thinking bending forward the tubes on my DIY tray, but no real need)

Hope this helps !

Fred
Education is important, but flying RC planes and gliders is importanter!

johnfireball

  • Newbie
  • *
  • Posts: 276
    • View Profile
DIY Radio tray
« Reply #26 on: July 24, 2013, 12:15:51 PM »
Thanks Fred.
John.
I have the body of an 18 year old.........I keep it in the freezer

johnfireball

  • Newbie
  • *
  • Posts: 276
    • View Profile
DIY Radio tray
« Reply #27 on: July 26, 2013, 20:30:42 PM »
Ta..Daa


Sits really well.
John.
I have the body of an 18 year old.........I keep it in the freezer

EI1638

  • Newbie
  • *
  • Posts: 128
    • View Profile
DIY Radio tray
« Reply #28 on: July 28, 2013, 10:17:20 AM »
Hi John,

just saw your post now. I used some left over tube I had and cut it in two. The  lengths Fred mentioned sound about right, for some reason 180 mm comes to mind, but essentially it was half the length of the tube. The half lengths were close to TLAR in Freds original photos.

Not sure if I said earlier, but I used pins (actually lengths of paperclip) to lock my M6 nylon screws into the tubes. Can't remember if I used epoxy or cyano to hold them in place. Since my tube walls wre fairly thick l (1mm) I didn't think there would be much bending moment on the pins, so I could get away with a softer metal pin.

Stuff is all locked away to go travelling so can't measure at the moment.

Chris

mick a

  • Newbie
  • *
  • Posts: 142
    • View Profile
DIY Radio tray
« Reply #29 on: February 27, 2015, 08:24:26 AM »
hi fred
are you doinfg the trays as cnc cut kit ??