Author Topic: Mini Quark build  (Read 20842 times)

johnfireball

  • Newbie
  • *
  • Posts: 276
    • View Profile
Mini Quark build
« on: April 27, 2015, 00:42:28 AM »
Hi all,
       I received my quark mini kit last Friday, many thanks Fred, and as usual got stuck in straight away. The kit contains a detailed plan and all the wood needed for completion, beautifully cut and of good quality. The carbon spars, leading edges, wing joiners and control fittings must be purchased elsewhere.
   

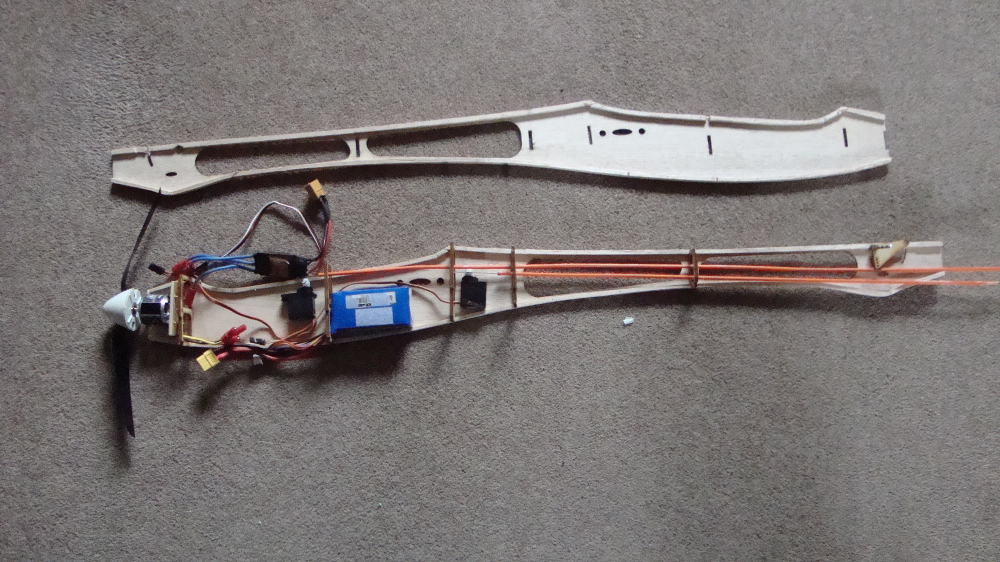
I have decided to try an electric conversion using a Turnigy Park 450 1050kv motor with a 25 amp speed controller a 1200ma 3s zippy lipo and a 9xsomething folding prop. Servos are hobbyking 939 metal gear(never had one fail crashed and all) I have used this setup before on a glider with good results. The problem is fitting it all into this narrow fuse. I am using the layout as shown in the pic above doing away with the servo trays as supplied and gluing the servos to the fuse side. I will make a door on the underside for battery removal. I think with the layout as above the C/G will work out (time will tell).
So the build is started. I noticed the fuse slot for former C4 was not cut so I measured it up and cut it by hand on both sides. Servo mount ST1 needed corners filed to fit in formers C3 & C2 (I decided not to use it as gear wont fit), servo holes must be filed to suit servos used.  Next the small bellcrank bushes are glued, one to each fuse side inners and aligned by putting fuse sides back to back and inserting a 3mm rod through the holes. The stripwood supplied can then be glued to the fuse edges (pins and a few cuts required), again when dry back up the fuse sides and sand flush with the laser cut black edges.
 
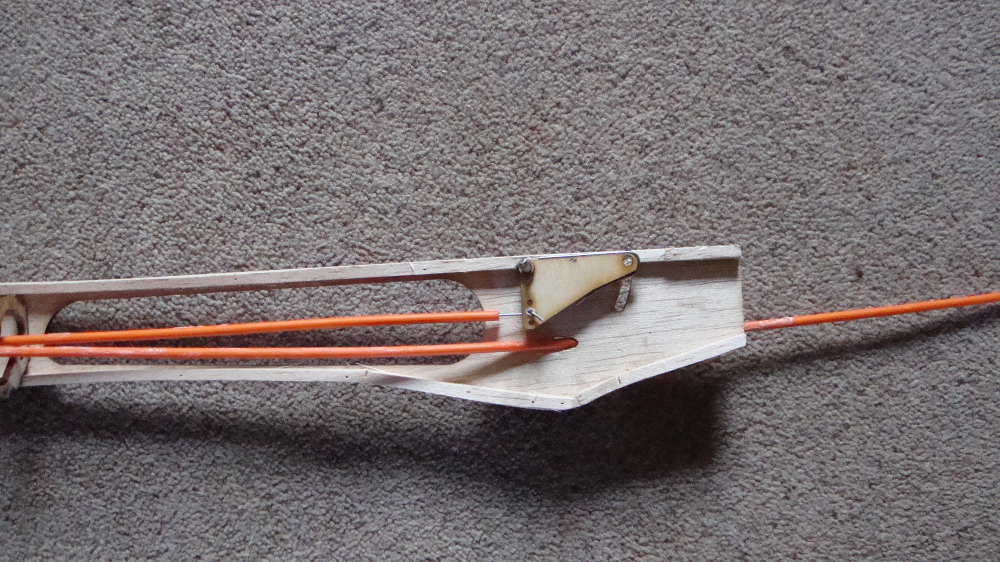
Glue the servos to the fuse sides or if using servo mounts assemble formers C3 and C4 and mount servos. I used snakes for the elevator and rudder controls and set up the bellcrank before joining the fuse halves (it's much easier this way). Glue a plywood shim to each side of the bellcrank alligning with a 3mm rod (a drill bit in my case), I bushed the bellcrank with a nylon tube to suit the snake wire (no play here is good), glued the servo to the fuse side, set it to neutral and made up the snake to give near neutral bellcrank as in the pic above(it's a little up but will trim out). Rudder snake is easy with a little filing of the fuse hole.
 
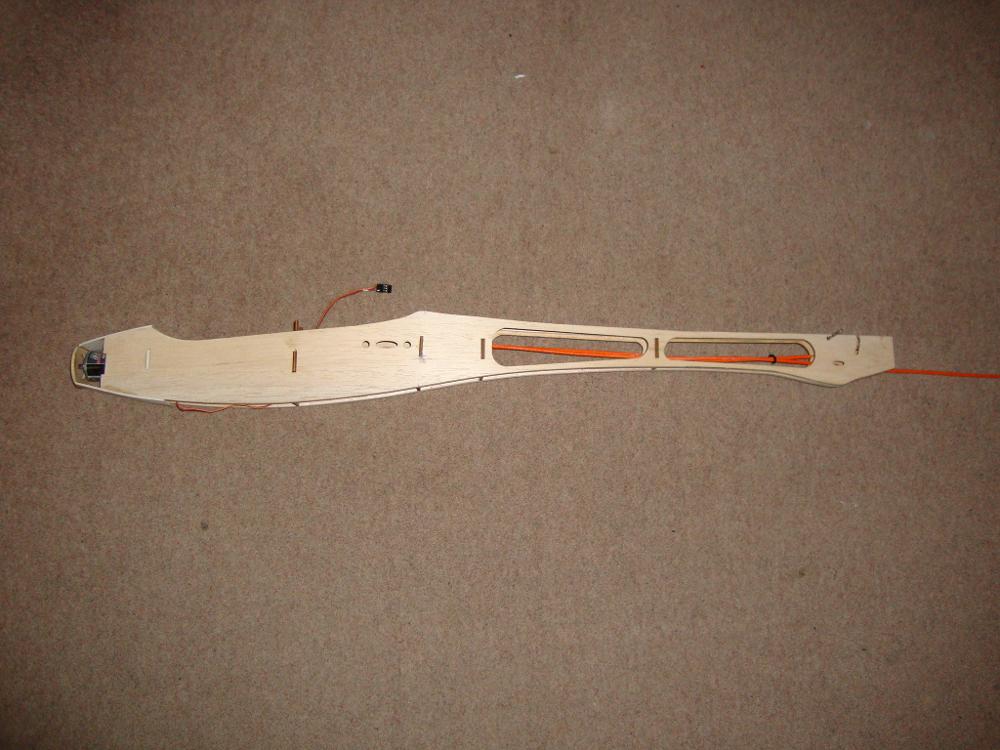
I then put the whole fuse together with the formers fitted but unglued, pin through bellcrank and taped everything into allignment and when happy ran cyano into each joint. I made a new front former slightly larger to suit the motor mount and fixed it approx 15mm rearward of the position of the C1 former. Getting started now on the motor cowling.

John.
I have the body of an 18 year old.........I keep it in the freezer

Happy Days

  • ISR Club Member
  • Newbie
  • *
  • Posts: 2184
    • View Profile
Mini Quark build
« Reply #1 on: April 27, 2015, 09:53:39 AM »
Just a suggestion John. If your power train set up has not been tried before, you might like to set it up on the work bench and try it first. Without knowing the pitch of the prop you might find the motor and or esc start getting a bit hot, :oops:  in which case you will need to change something in the set up.

Also, while on the subject of “heat management” don’t forget that the motor, ESC and possibly the battery will need a flow of cooling air. So some holes will be needed both in the nose and somewhere else within the airframe to allow the air to exit the fuse.

Keep up the good work! :clap:
Try not to run out of airspeed, altitude and ideas....... all at the same time.

johnfireball

  • Newbie
  • *
  • Posts: 276
    • View Profile
Mini Quark build
« Reply #2 on: April 27, 2015, 23:04:39 PM »
Hi Keith,
          The gear i'm using was salvaged from a 2m glider which I've flown many times with the motor fully cowled and never had any problems with heat (I did check). I will put some vent in the cowl base.

Finished the nose shape. I don't think it takes from the quarkeyness of the Quark and blends in well. Made up canopy using temporary glued in spacers to get the size right and added the plywood tailplane spacers to the back of the fuse.

John.
I have the body of an 18 year old.........I keep it in the freezer

andrew wallace

  • ISR Club Member
  • Newbie
  • *
  • Posts: 593
    • View Profile
    • http://www.bmfc.btinternet.co.uk
Mini Quark build
« Reply #3 on: April 28, 2015, 15:52:41 PM »
:clap:  :clap:  :clap:  :clap:  :clap:  :clap:  :clap:
that's a nice piece of work John
i\'m an ordinary man nothing special nothing grand

johnfireball

  • Newbie
  • *
  • Posts: 276
    • View Profile
Mini Quark build
« Reply #4 on: May 03, 2015, 00:09:38 AM »
Hi,
Bit more done. I used nylon snake tube and piano wire for the bellcrank and tailplane fixings as suitable carbon was not readily available. Works well, the bellcrank pivots nicely on it. I epoxied a wire around the bellcrank top for extra strength.
 

I have the wing building near complete having obtained suitable carbon (thanks to model heli services I received it within one day). The wing servos are too thick to fit fully inside inside the wing so I cut holes in the ply covers supplied to fit. The servos will protrude out the bottom by 2mm. I will hot glue them in. Fred incidence pin holes in ribs N2 and N3 would be nice, I filed them out to suit.
 
John.
I have the body of an 18 year old.........I keep it in the freezer

johnfireball

  • Newbie
  • *
  • Posts: 276
    • View Profile
Mini Quark build
« Reply #5 on: May 06, 2015, 00:24:22 AM »
Hi,
  Nearing the end of build now, covering in progress, cg looks good maybe 15mm forward of where indicated on plan. Weight with battery 570grm and 450grm without. I added a false spar above the carbon to support the covering a little better. Hoping to have it ready for weekend.


Servos at 12mm thick protrude slightly from lower wing, but look ok. The covering I used is more transparent than I wanted (problem with online buying is you don't get a proper look at the goods).


John.
I have the body of an 18 year old.........I keep it in the freezer

alibodin

  • Newbie
  • *
  • Posts: 77
    • View Profile
Mini Quark build
« Reply #6 on: May 06, 2015, 09:05:25 AM »
Looking good John,

I like the semi transparent covering think it looks nice. Thought it was by choice until I read the text.

A good inspiration,

Alistair

johnfireball

  • Newbie
  • *
  • Posts: 276
    • View Profile
Mini Quark build
« Reply #7 on: May 06, 2015, 12:43:31 PM »
Hi,
   I do like the look but I would have before building sanded all the laser burn from the parts as it shows through the covering especially on rib edges and gives a dirty look.
John.
I have the body of an 18 year old.........I keep it in the freezer

Fred

  • Slope Soaring is not a crime!
  • Administrator
  • Newbie
  • *****
  • Posts: 5121
  • Gliderist Simplex
    • View Profile
    • http://www.gliderireland.net
Mini Quark build
« Reply #8 on: May 07, 2015, 07:55:26 AM »
I like it John!
Love the cream colour, and the way you did the nose is very nice, really blend well with the fuselage  :clap:  :clap:
Education is important, but flying RC planes and gliders is importanter!

johnfireball

  • Newbie
  • *
  • Posts: 276
    • View Profile
Mini Quark build
« Reply #9 on: May 09, 2015, 23:03:54 PM »
Hi all,
       So the electric micro quark had her maiden flight today on Killakee slope and was successful despite a few minor hiccups. Peter launched it for me into a sw wind with minimal lift and it performed very well as a glider however when I applied power the aileron and elevator controls became incredibly sensitive (due to the increased air passing over them) and the model became unflyable under power. I reduced the rates and what a difference, it was a different model.

 [youtube]https://www.youtube.com/v/MrpTcLCb1vg[/youtube]


I noticed some aileron flutter at the inboard ends under power and feel I will have to do some work to make the ailerons more rigid and prevent twisting.


Resting between flights.

Overall I think this model has the potential to make a superb electric glider for flying on slope or flat field. It climbs so fast near straight up that only a few seconds on power will have it near out of sight and ready for the glide down. It flies fast and stable as a glider and seems to stay up even in marginal lift.
Looking forward to flying it again.

John.
I have the body of an 18 year old.........I keep it in the freezer

billscottni

  • ISR Club Member
  • Newbie
  • *
  • Posts: 1459
    • View Profile
    • http://www.nimsa.co.uk ; www.billscott.org.uk
Mini Quark build
« Reply #10 on: May 10, 2015, 17:22:16 PM »
If your radio will allow it John, you could set it up a mix, so that as you open the throttle the travel on the elevator & aileron reduces. Might make it more user friendly under power  :?:

johnfireball

  • Newbie
  • *
  • Posts: 276
    • View Profile
Mini Quark build
« Reply #11 on: May 11, 2015, 00:01:51 AM »
Hi Bill,
       It would be nice but I don't think my radio can do that. However thinking back, I had loads of expo set up but forgot to turn the switches on to activate it so was flying on sensitive setup. I always get the basics wrong Doh.

In the meantime I've beefed up the ailerons by carving back the rib tops and sheeting with 1/16. I also added  shear webbing. This combined with stronger hinge tape should solve the flutter problem. They're pretty rigid now.
 

John.
I have the body of an 18 year old.........I keep it in the freezer

Happy Days

  • ISR Club Member
  • Newbie
  • *
  • Posts: 2184
    • View Profile
Mini Quark build
« Reply #12 on: May 11, 2015, 09:24:01 AM »
Well done John :clap:

 A new Hybrid glider for the market place? Or just a one off for yourself? :?:

No doubt Fred will frown on the concept and call out “Cheat” whenever he sees it flying. :roll:

Although come to think of it that would be a good name for it, don’t you think?

 “The Cheetah…". (Fast and Agile) :D

 Well I thought it was a good idea anyway. :lol:

K.
Try not to run out of airspeed, altitude and ideas....... all at the same time.

johnfireball

  • Newbie
  • *
  • Posts: 276
    • View Profile
Mini Quark build
« Reply #13 on: May 11, 2015, 22:42:51 PM »
Hi Keith,
          Yes cheetah would be quite apt. I do think this conversion would go down well and appeal to more than just slope fliers (it goes so well). If you get to try it before I break it you will want one. Going to try it again on wednesday evening on flat field and see how mods work out.

John.
I have the body of an 18 year old.........I keep it in the freezer

Fred

  • Slope Soaring is not a crime!
  • Administrator
  • Newbie
  • *****
  • Posts: 5121
  • Gliderist Simplex
    • View Profile
    • http://www.gliderireland.net
Mini Quark build
« Reply #14 on: May 12, 2015, 07:43:50 AM »
Congratulations John!  :clap:  :clap:
First electric Micro Quark of the known Universe :)
Looks like it is flying very well on top of that!

For the flutter, good move on the ailerons, as it was not originally designed to go like a mini hot-liner, but that thing looks like it is doing well in this area as well  :clap:

Could not go flying on Saturday... Wife decided I had to re-do a bathroom  :!:  Would have loved to see it in the flesh (thanks for the video!)
Education is important, but flying RC planes and gliders is importanter!